Contact
It is the area where the contacts or customers in the accounts the organization is working with are added.
Adding New Contact
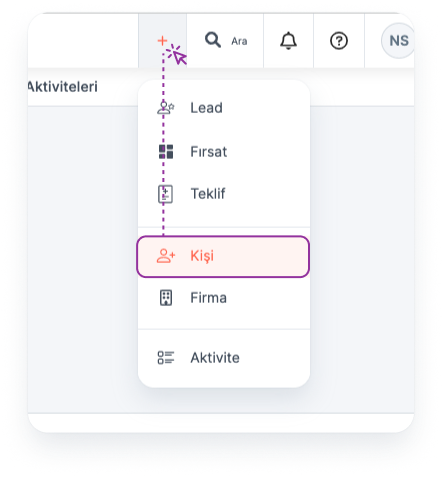
A contact can be added by clicking the Add New button on the main menu.
Main menu > Contact > Add New
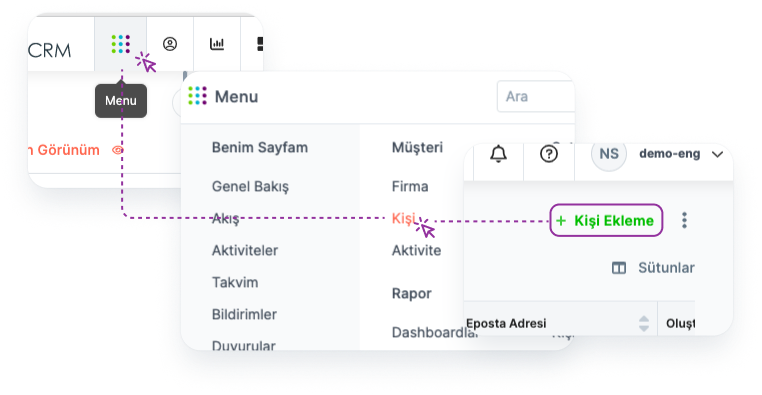
A new contact can be added by going to the Contact page where the contacts are listed.
Main Menu > Contact > Add New Contact
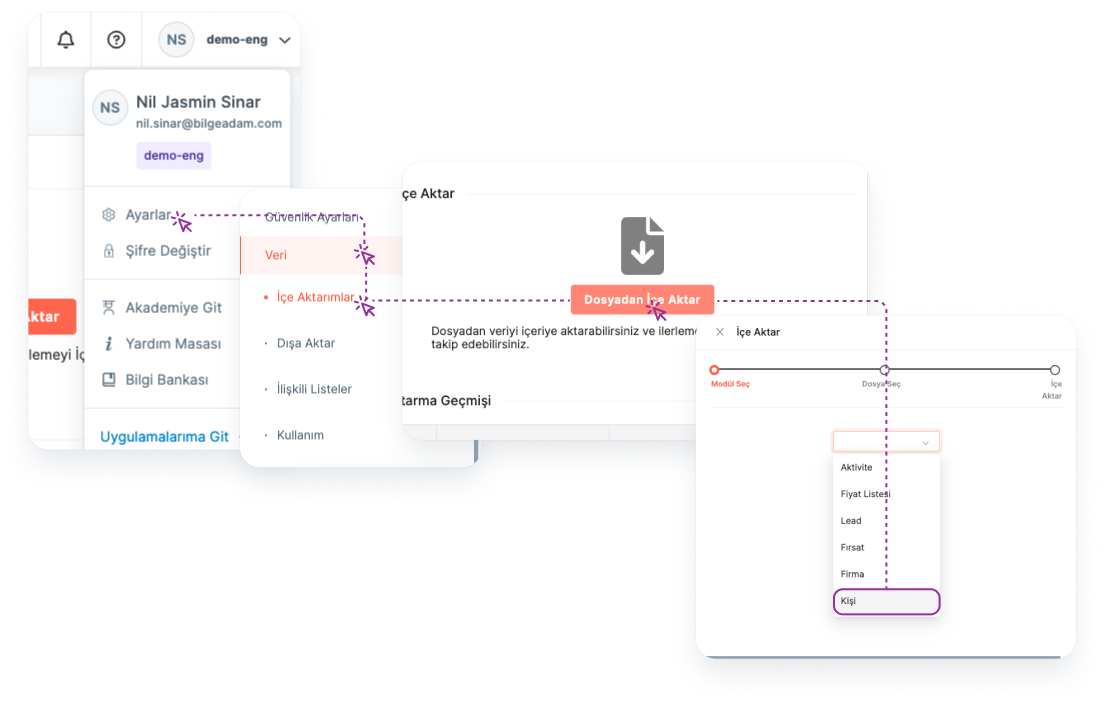
Contact Import
🔑 Admin authorization is required for this operation.
People can be added collectively under the Settings menu.
Settings > Data > Imports > Import from File > Module Selection > Contact
Listing Added Contacts
To list added contacts:
Main Menu > Contact
Column Settings
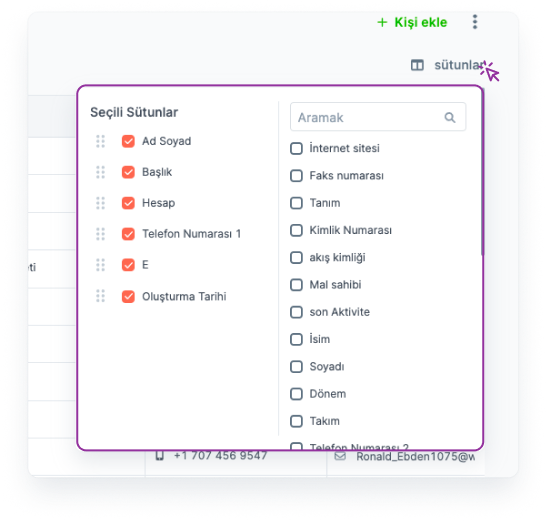
By clicking the Columns button, the fields listed in the contact table can be shown, hidden or the order of their display can be changed.
Searching
Search can be made by entering the desired word in the search box.
Note: A search is made in all fields in the contact list with the searched word.
Filtering
People can be filtered by selecting the relevant field/fields from the Quick Filter button.
For example: Contacts whose account name is BilgeAdam.
Export List
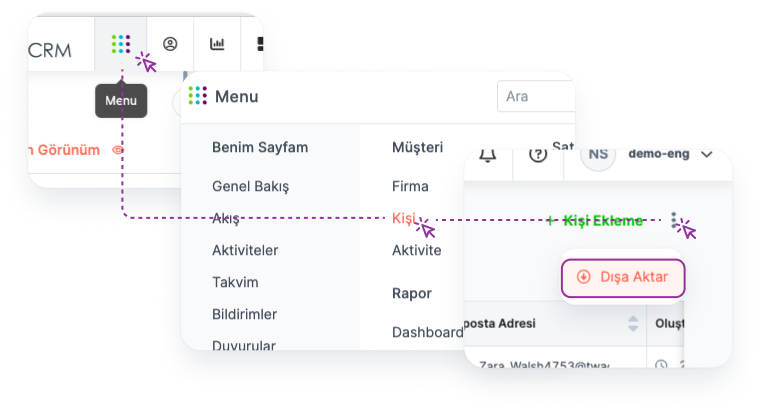
Preparing the contact table for Export:
Main Menu > Contact > More > Export
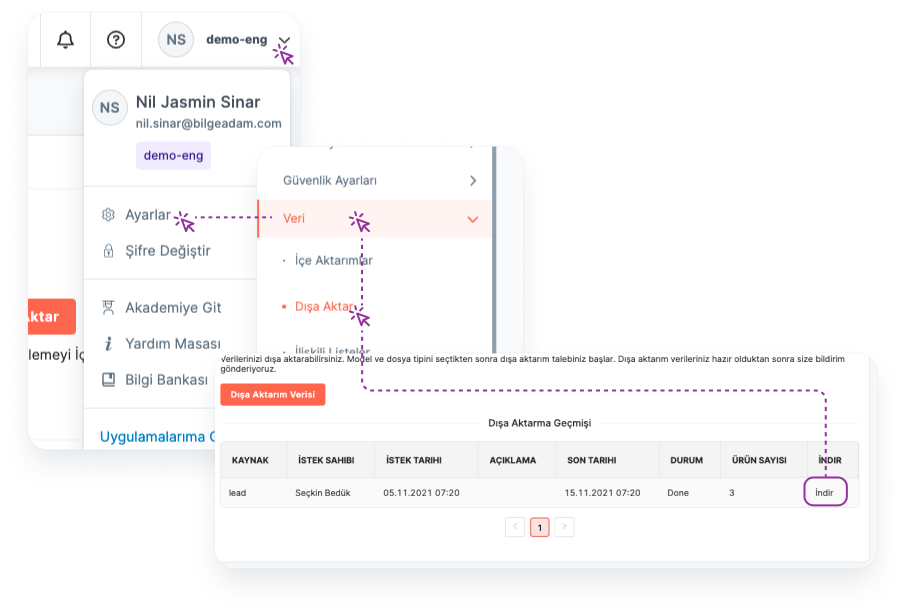
Exporting Contact Table as Excel File:
Main Menu > Settings > Data > Export > File > Download
View
Filtering operations and column settings made on the list can be saved as View for quick access.
More info about Filter and View->
Contact Details Page
All information related to the contact is on the Contact Detail page.
Reaching Contact Details

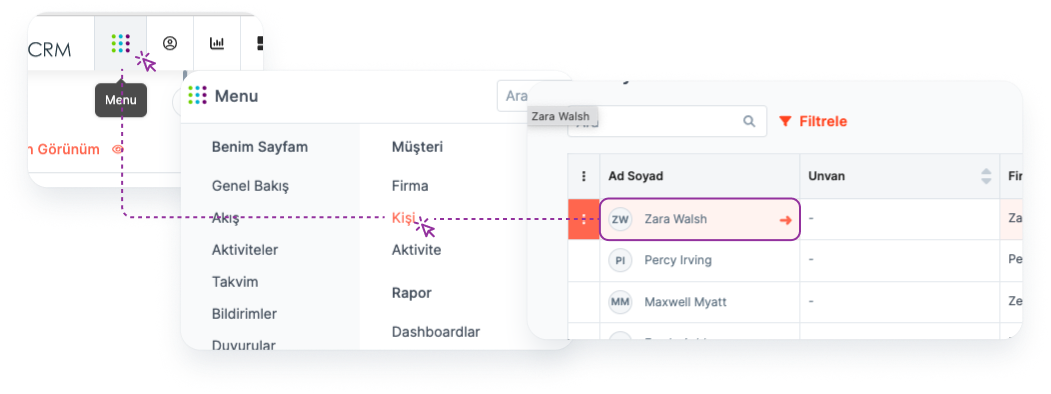
By clicking Name Surname, contact details can be accessed.
Main menu > Contact > Name Surname
Fields in Contact Details
The "Menu" on the left of the page can access the following fields in relation to the Contact:
Detail: On the contact detail page, you can access all the necessary data about the contact, such as phone number, email address, date of birth, department, title, social media accounts.
Activities: Meeting, Task and Call type activities that users associate with Contact are displayed in this area. You can also add an activity from this area.
Note: Activity types can be customized by institutions.
- Lead: This is the field where the Leads associated with the contact are listed.
Products of Interest: The list of contact's interest in the products of the organization can be displayed and a new product can be added.
Opportunity: This is the field where the opportunities associated with the contact are listed. You can also add an opportunity from this area.
Files: Documents associated with the contact can be viewed and new documents can be added.
Quote: This is the area where offers related to the contact are listed. You can also add offers from this area.
- Payment Plan: This is the area where the payment plans associated with the contact are listed. You can also add a payment plan from this area.
More info about Payment Plan->
- History: It is the field where the whole process, which starts with adding the contact to the system, is recorded with the contact who performed the transaction and the date.
Contact Owner's Powers
The user who created the contact is called Contact Owner and has the following privileges on the contact:
Viewing
Arrangement
Deletion
Labeling
Authorization
Transfer
Note: Users in the same team can view, edit and delete contacts created by different people within the team.
Viewing Contact
🔒 For this operation, the user must be Contact Owner or On the same team as the Contact Owner. If any of these conditions are not met, authorization must be requested from the contact owner.
To view the contact details, follow the steps below:
Main Menu > Contact > Contact Detail
Editing Contact
🔒 For this operation, the user must be Contact Owner or On the same team as the Contact Owner.

Editing the contact from the contact detail:
Main Menu > Contact > Contact Detail > Edit
Deleting Contact
🔒 For this operation, the user must be Contact Owner or On the same team as the Contact Owner.
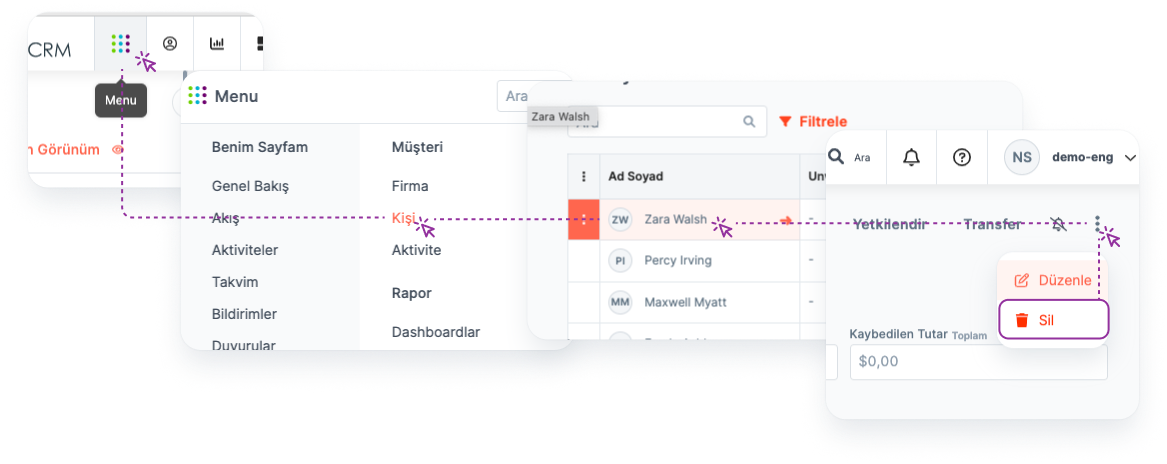
Deleting the contact from the contact detail:
Main Menu > Contact > Contact Detail > Delete
Labelling the Contact
🔒 For this operation, the user must be Contact Owner or On the same team as the Contact Owner. If any of these conditions are not met, authorization must be requested from the Contact owner.
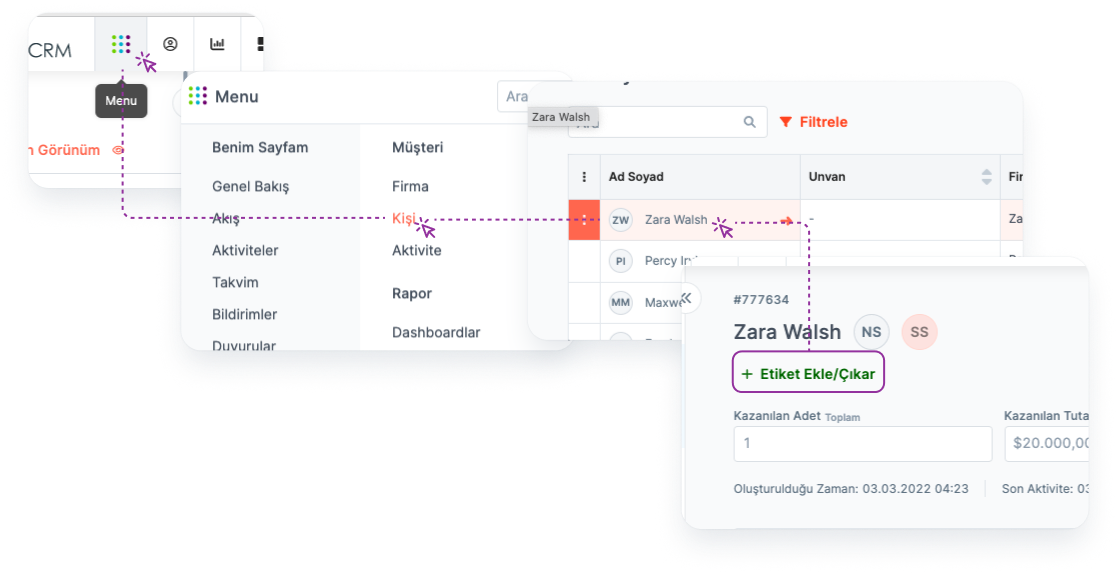
Use Label to categorize people.
Main Menu > Contact > Contact Detail > Label
Authorizing Users in Different Teams on Contact
🔒 The user must be Contact Owner for this operation.
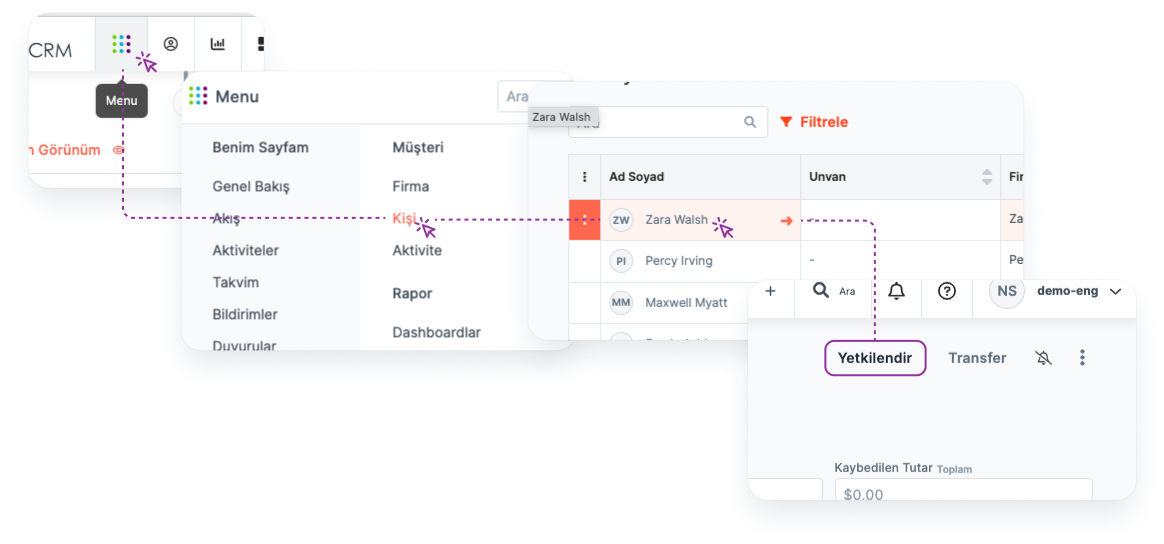
Authorizing the relevant account from the contact details:
Main Menu > Contact > Contact Details > Authorize
The contact owner can authorize users in different teams to:
viewing
Deletion
Arrangement
Labeling
Fields in the Add Contact Form
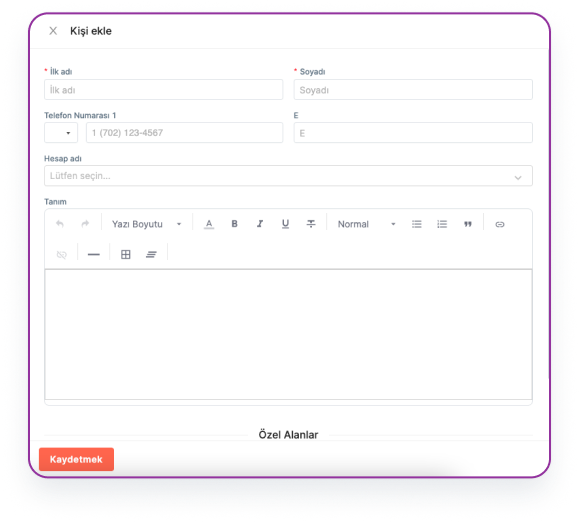
Required Fields
When creating the Contact, you must fill in the following field:
Name: Refers to the contact's name.
Surname: Indicates the surname of the contact.
Non-Required Fields:
Mobile Phone: The contact's or acccount phone number.
E-mail: It is the contact or account e-mail address of the contact.
Account/Institution: It is the account information that the contact is affiliated with.
Description: This is the field where all notes about the contact can be entered.
Customizing Contact Add Form and Contact Details Page
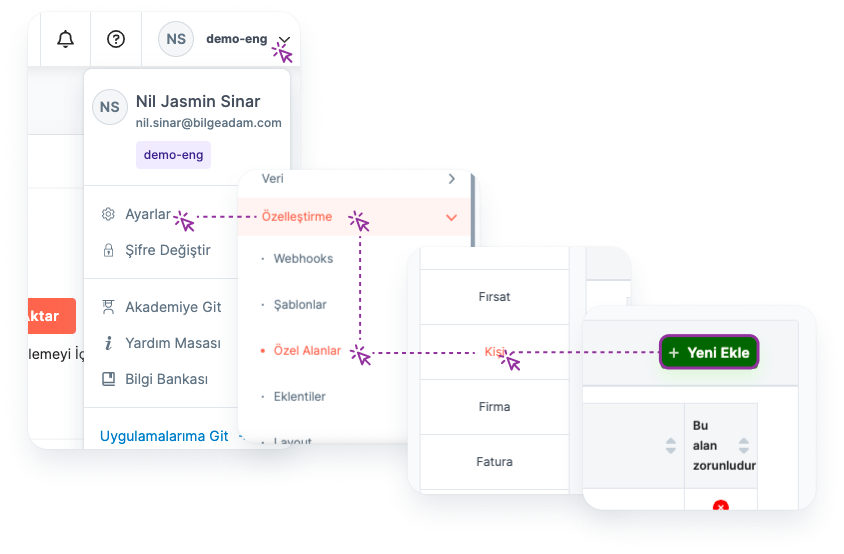
🔑 Admin authorization is required for this operation.
Contact adding form and contact detail page can be customized according to the needs of the contact.
Customize the add contact form:
Main Menu > Settings > Customization > Special Fields > Contact > Add New
*Note: The relevant buttons must be activated during the customization process so that the custom fields you add can be displayed on the Add account form and on the account edit page.*