Invoice
Invoice is the field where the payment plan, amount and total amount to be paid information of the product or service sold are documented.
Adding New Invoice
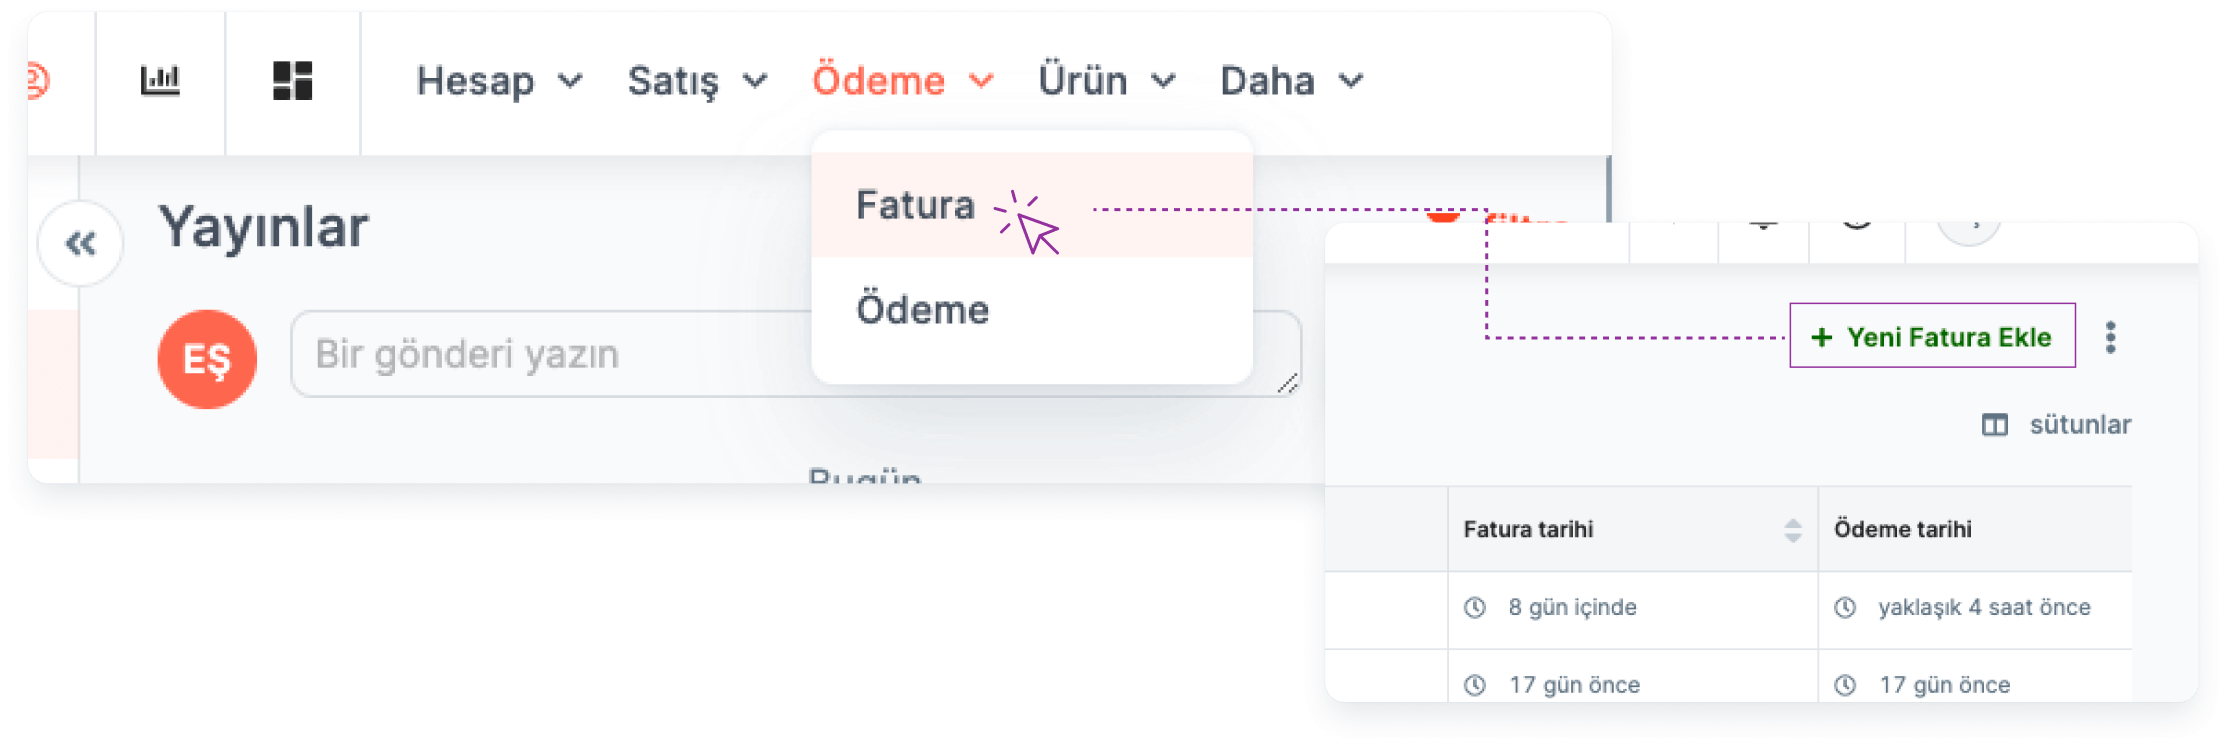
You can add a new Invoice by going to the "Invoice" page where the invoices are listed.
Main Menu > Invoice > Add New Invoice
Listing Added Invoices
To list the Invoices you have added:
Main Menu> Invoice
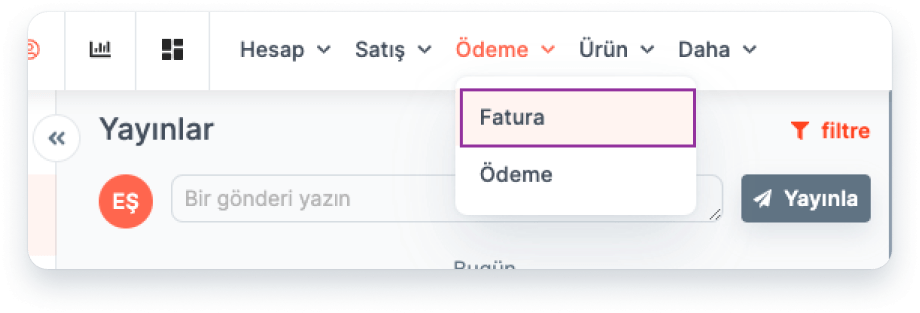
Column settings:
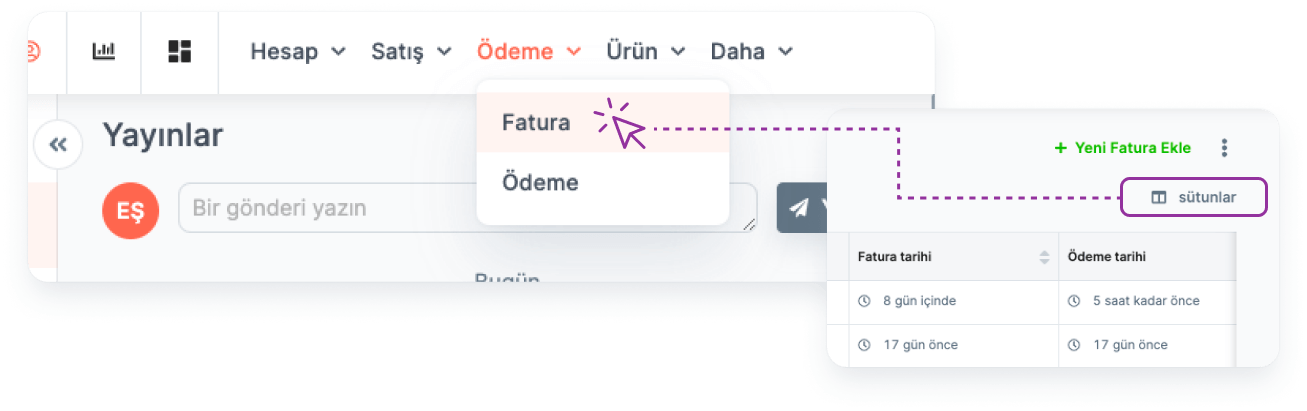
By clicking the "Columns" button, the fields listed in the Invoice table can be shown, hidden or the order of their display can be changed.
Searching:
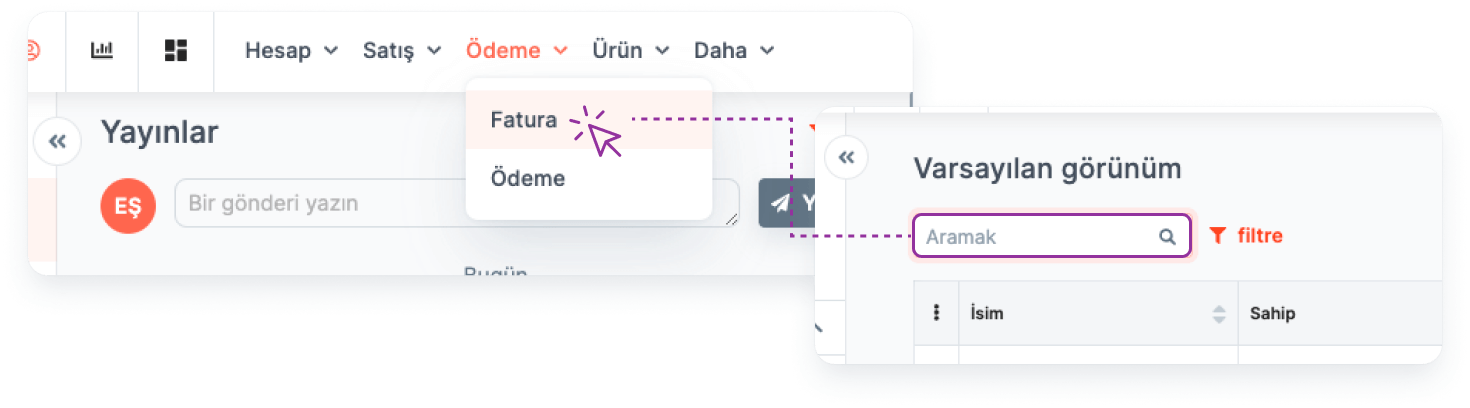
Search can be made by entering the Invoice Title in the search box.
Note: Searched word and Invoice Title must be exactly the same.
Filtering:

Invoices are filtered by selecting the relevant field/fields from the "Quick Filter" button.
For example: Invoices with a Final Amount greater than 3,000,000 TL.
View:
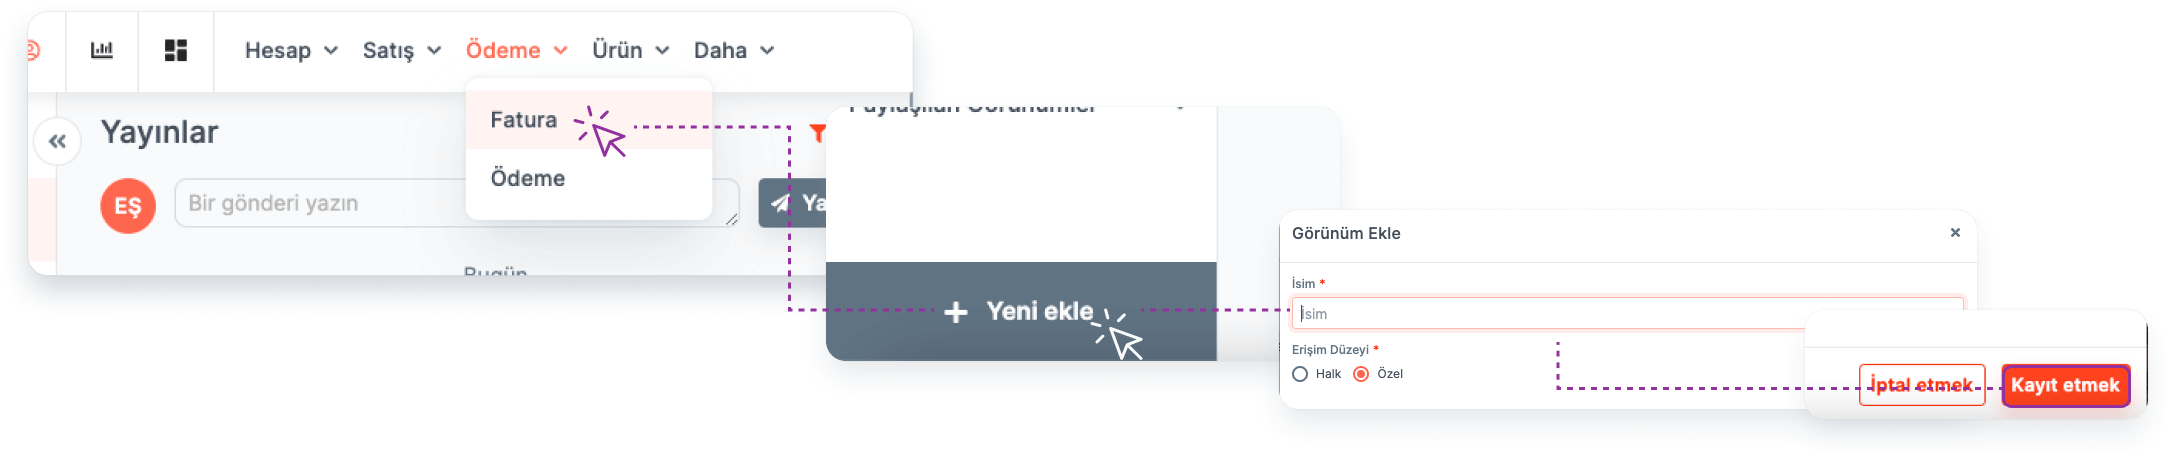
Filtering operations and column settings made on the list can be saved as "View" for quick access.
More info about Filter and View->
Invoice Detail Page
All information related to the invoice is available on the Invoice detail page.
- Reaching Invoice Details:

Invoice detail is reached by clicking on Invoice Title.
Main menu > Invoice > Invoice Title > Invoice Detail
Invoice details can be accessed by clicking the "More" button on the invoice list view page.
Main menu > Invoice > More > Go to Detail
- Fields in Invoice Details:
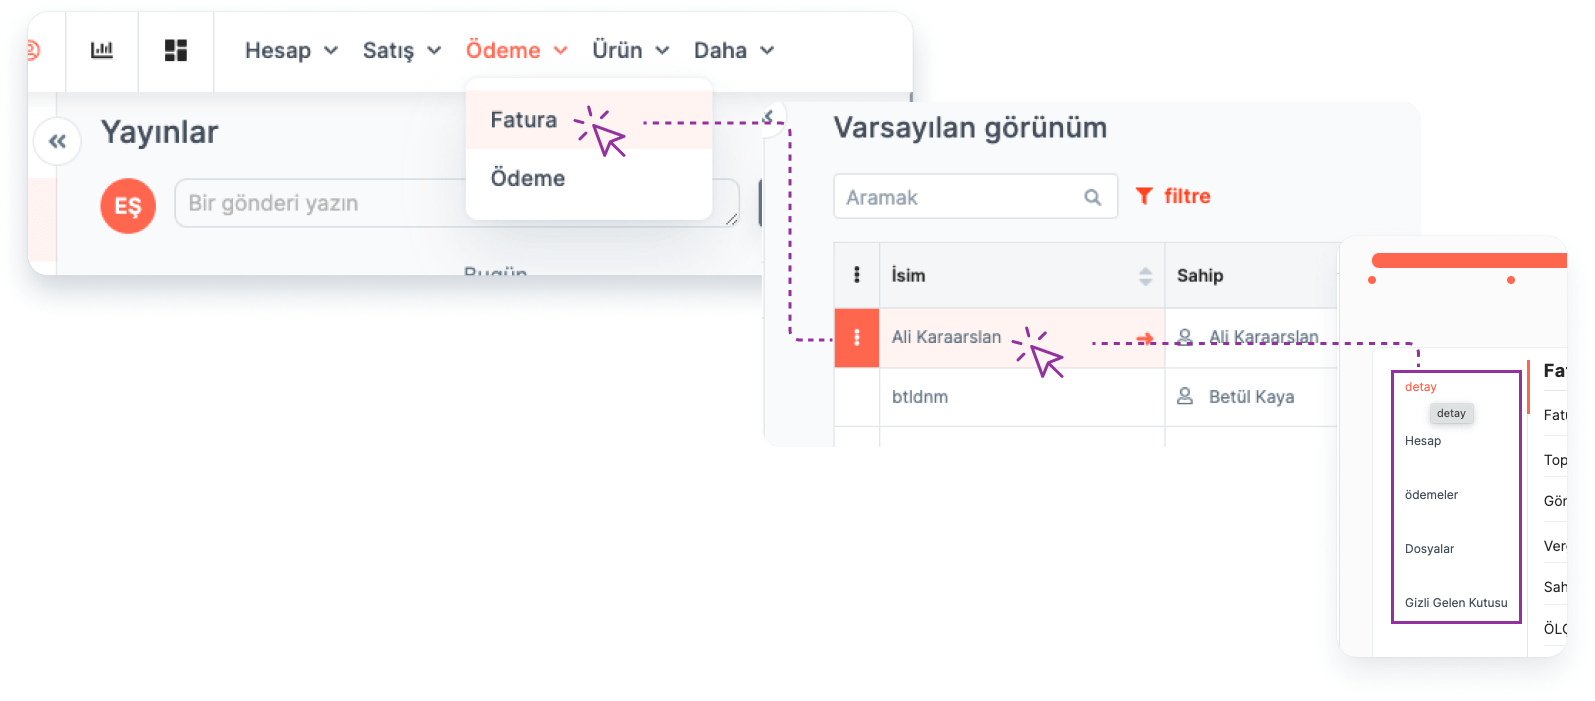
The following fields can be accessed in relation to the Invoice via "Menu" on the left of the page:
Detail: Invoice Date, Number, Total Amount, Invoice Sending and Payment Dates, Tax Percentage, Authorized Person and Team information can be accessed. In addition to these, the invoiced opportunity and the payment plan information of this opportunity are also listed.
Account : Detailed information about the company to which the invoice will be sent can be accessed.
- Files: This is the area where the documents related to the invoice are listed. You can also add documents from this area. Documents can also be previewed, downloaded, authorized and shared via e-mail from this area.
Invoice Viewing
🔒 The user must be in the same team as "Invoice Owner" or "Invoice Owner" for this operation. If any of these conditions are not met, authorization must be requested from the Invoice owner.
To view the invoice detail, follow the steps below:
Main Menu > Invoice > Invoice Title > Invoice Detail
Invoice Editing
🔒 The user must be in the same team as "Invoice Owner" or "Invoice Owner" for this operation.
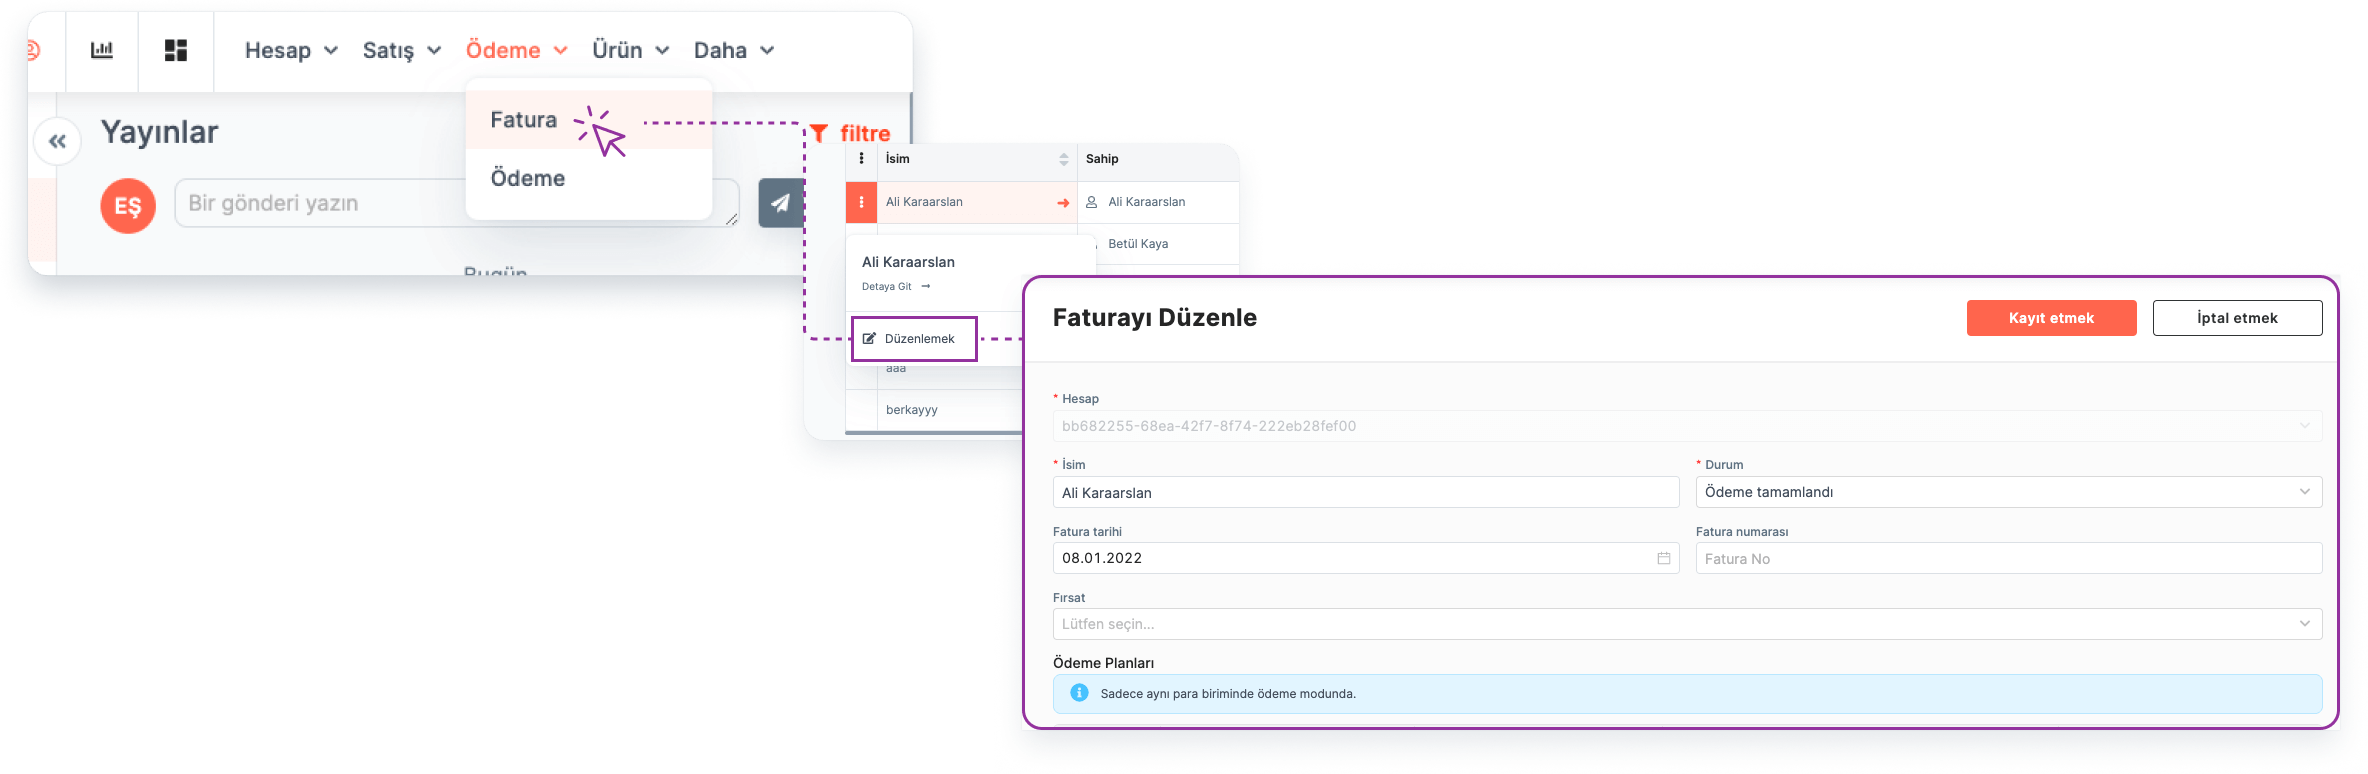
Editing the relevant Invoice from the Invoice detail:
Main Menu > Invoice > Invoice Title > Edit
Note: Edit option can be seen by clicking the three dots in the upper right corner of the invoice detail page.
Editing the relevant Invoice from the invoice detail:
Main Menu > Invoice > More > Edit
Invoice Deletion
🔒 The user must be in the same team as "Invoice Owner" or "Invoice Owner" for this operation.
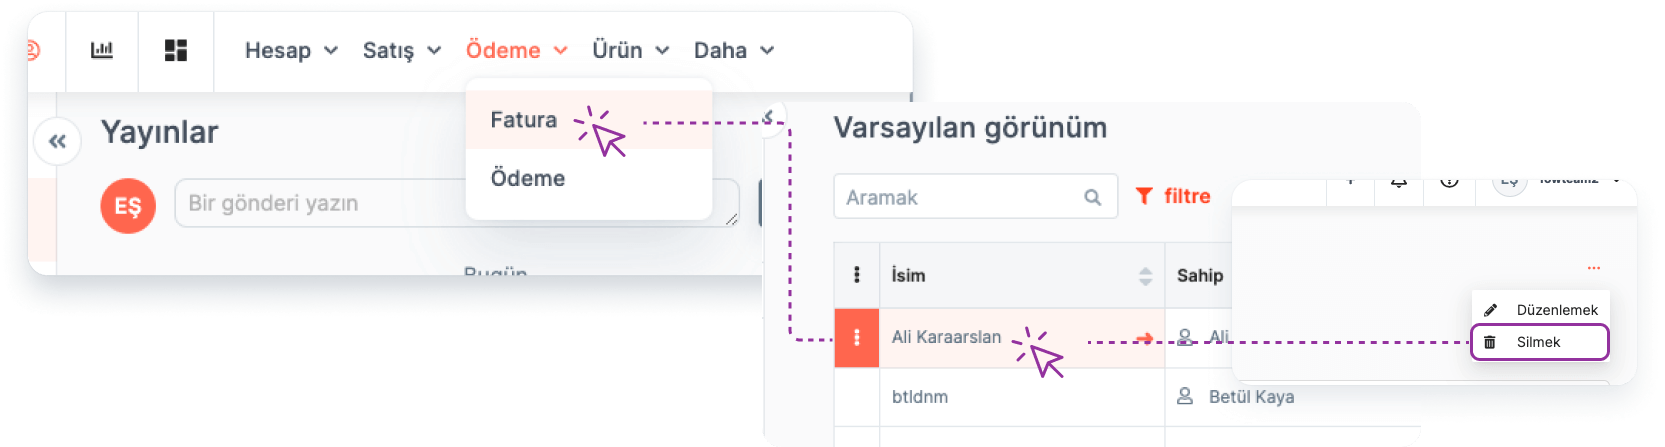
Deleting the relevant Invoice from the Invoice detail:
Main Menu > Invoice > Invoice Title > Invoice Detail > Delete
Invoice Label
🔒 The user must be in the same team as "Invoice Owner" or "Invoice Owner" for this operation. If any of these conditions are not met, authorization must be requested from the Invoice owner.
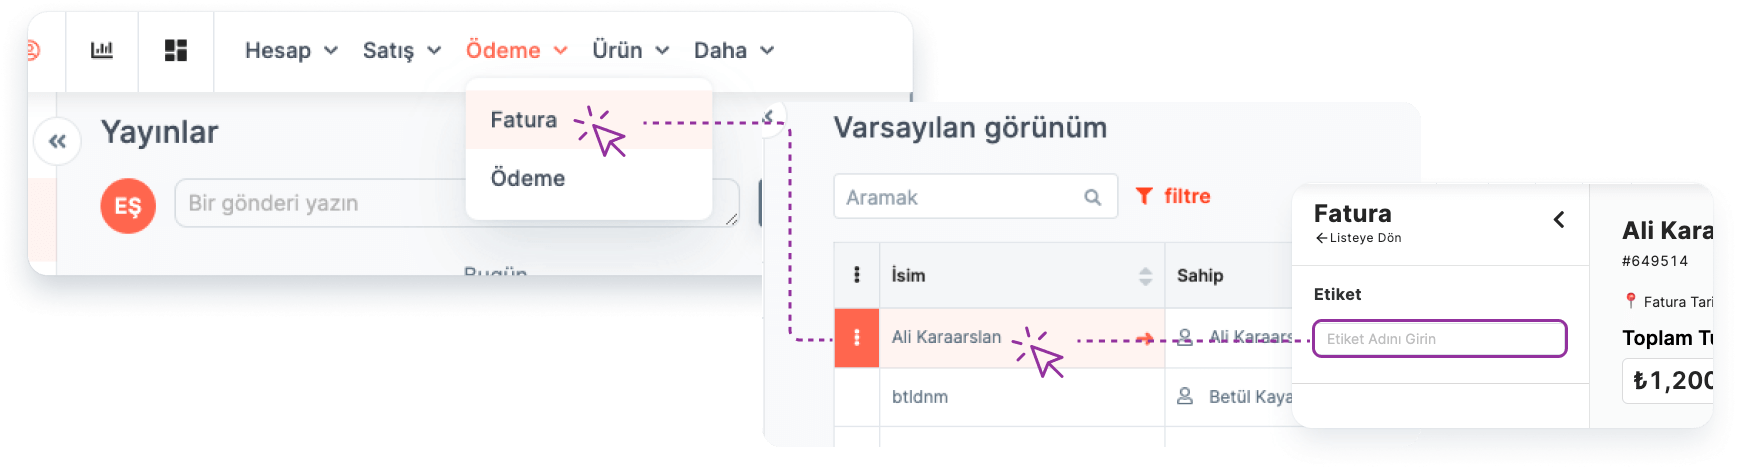
Use Labels to categorize invoices.
Main Menu > Invoice > Invoice Title > Invoice Detail > Label
Fields in Invoice Addition Form
Required Fields:
When creating the invoice, you must fill in the following fields:
Company: The company to which the invoice belongs must be selected from the relevant list.
Name: Invoice header must be added.
Status: The stage of the invoice can be selected from the relevant list. For example, the created Invoice can take place in one of the following states:
New Invoice
Payment Started
The payment is complete
Sent to Customer
Note: The status list of the invoice can be personalized according to the user.
More info about Module Settings->
Total Amount (Excluding Tax): Includes information on the total amount of the relevant payment without including tax.
Total Amount (Tax Included): Includes the total amount of the relevant payment, including tax.
Note: While defining the invoice, the relevant opportunity is selected in the "Opportunity" box. If there is a defined payment plan in the selected opportunity, invoice definition can be done by selecting one of them. The system automatically calculates the Total amount here. Payment plan selection is not mandatory. If there is no defined payment plan, the user can also enter the total amounts manually.
Non-Required Fields:
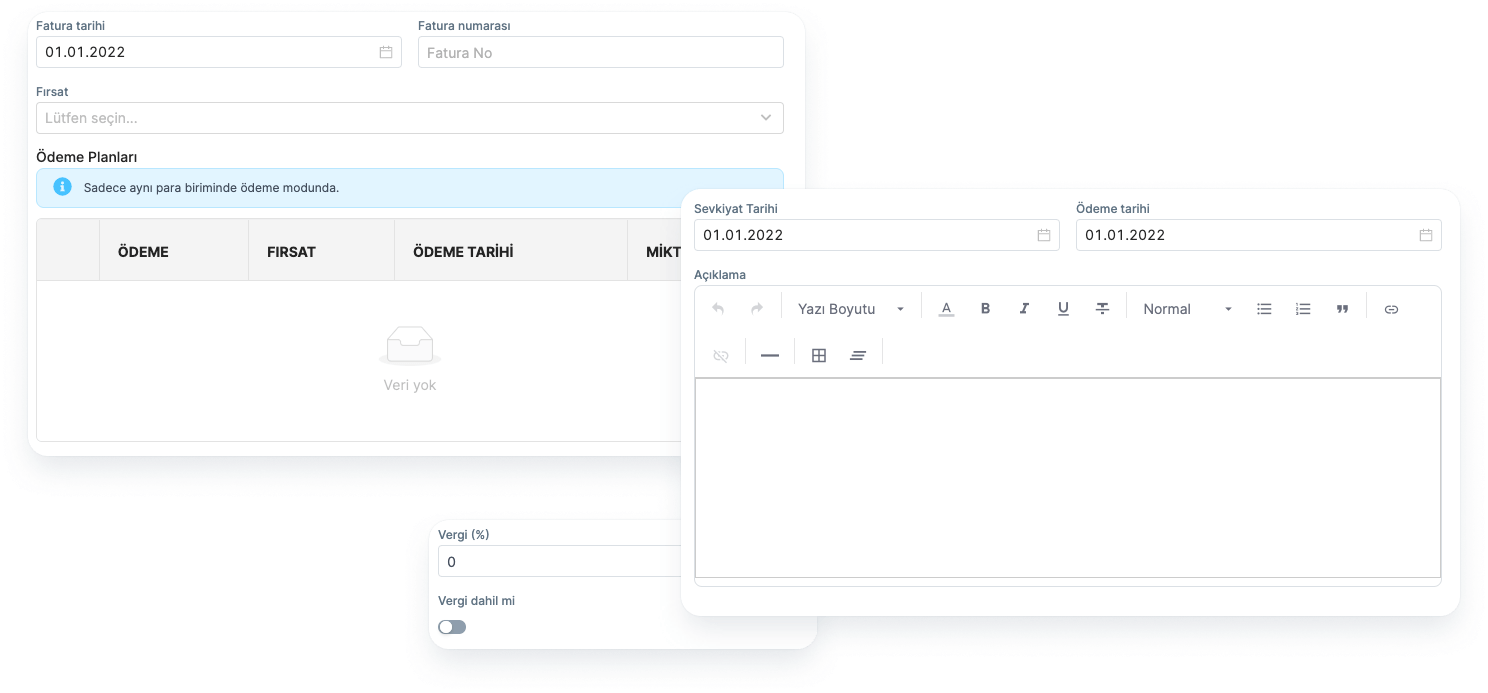
Invoice Date: Indicates the date the invoice was created.
Invoice Number: If there is a number determined by the user specifically for the Invoice, it can be defined here.
Opportunity: If the invoice is being created for an opportunity, the relevant opportunity title can be selected from the list.
Tax: The tax amount for the payment can be added by the user.
Date of Sending: The date of sending the invoice to the relevant company or person can be added.
Payment Date: The date on which the payment of the invoice will start can be added.
Explanation: This is the field where all notes related to the invoice can be entered.
Customizing Invoice Add Form and Invoice Detail Page
🔑 This operation requires admin permission.
Invoice form and Invoice detail page can be customized according to company needs.
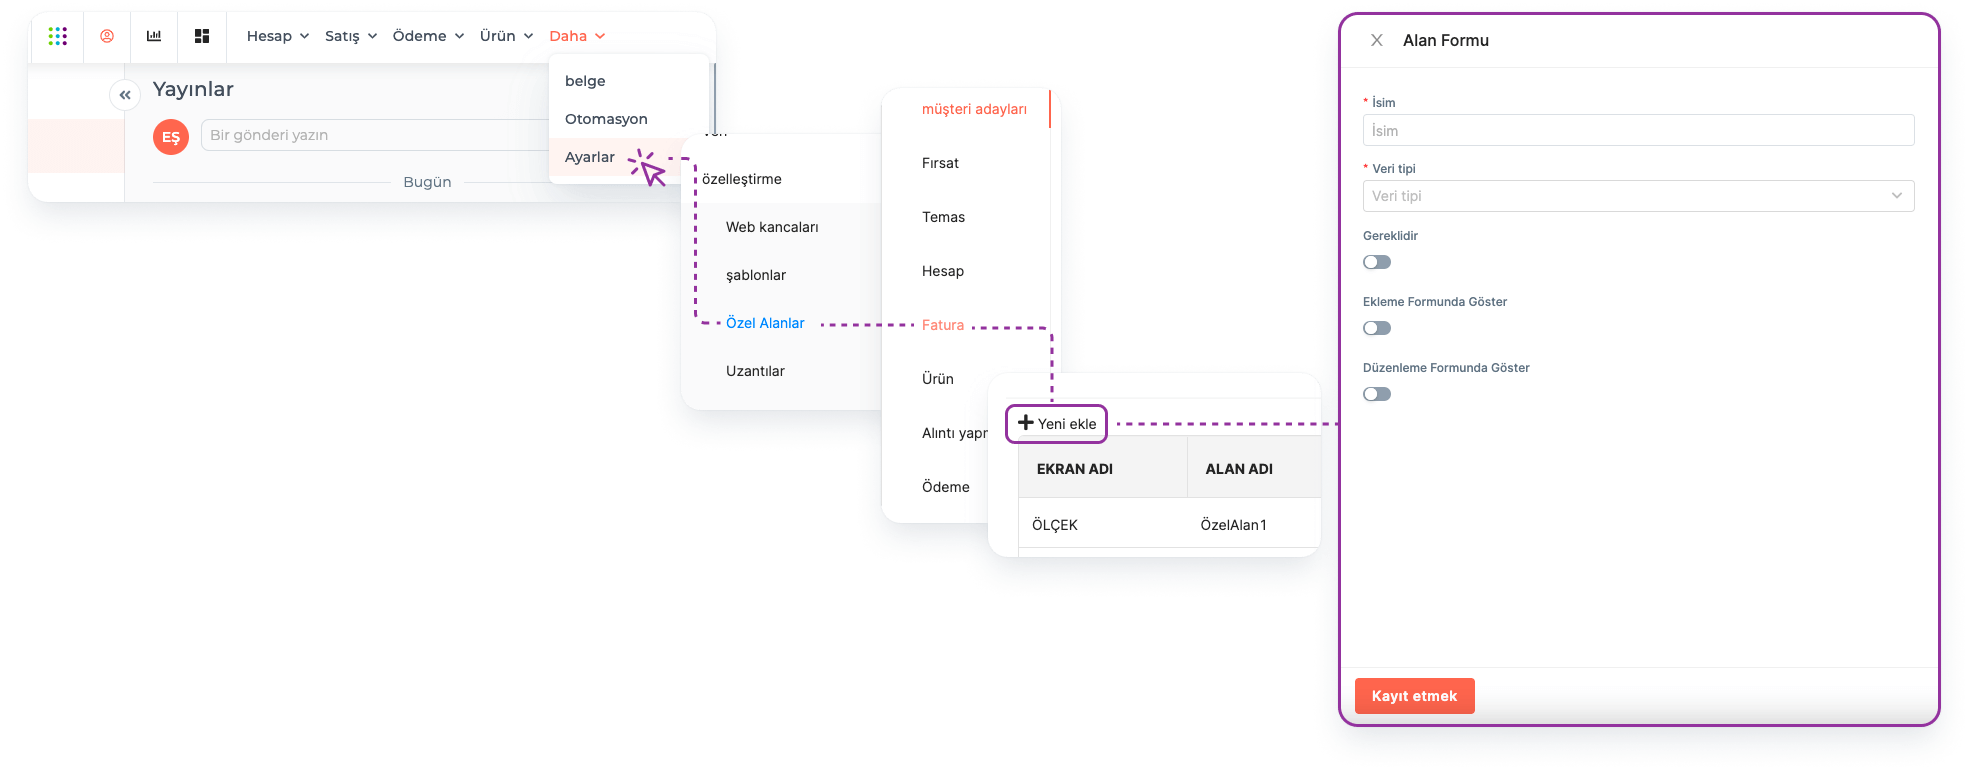
- Customize the invoice add form:
Main Menu > Settings > Customization > Special Fields > Invoice > Add New
*Note: The relevant buttons must be activated during the customization process so that the custom fields you add can be displayed on the Invoice add form and the Invoice editing page.*